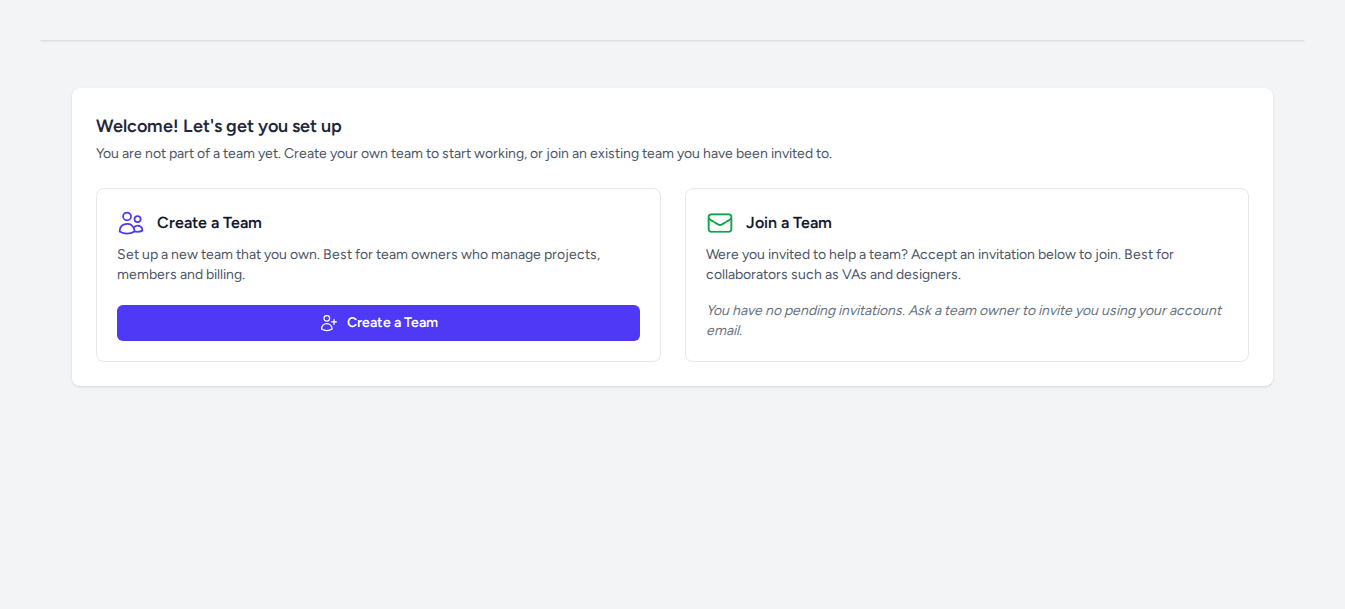
When you sign in to Vision for the first time, you’ll land on the Dashboard and see a welcome panel designed to get your workspace ready. Vision is team-based, so everything — your projects, your assets, and your credits — lives inside a team. This guide walks you through both paths: creating a brand-new team from scratch, or accepting an invitation to join one that already exists.
After this guide, you’ll know how to complete Vision onboarding so your Dashboard is fully set up and ready to use.
Before you start
- You have a Vision account. If you haven’t registered yet, complete registration first.
- If someone is inviting you to their team, make sure they’ve sent the invitation to the same email address you used to sign up.
1. Sign in and open the Dashboard
Go to the Vision Dashboard and sign in with your email and password.
Until you belong to a team, Vision shows a “Welcome! Let’s get you set up” onboarding panel instead of your normal workspace. Team-level navigation — including Projects — is intentionally hidden until setup is complete.
Tip: If you already see your projects and the team switcher in the header, your team is already active and you don’t need this guide.
From here, choose the path that fits your situation:
- Path A — You want to create a new team (you’ll be the owner).
- Path B — You’ve been invited to join someone else’s team.
Path A — Create a new team
2. Click “Create a Team”
On the onboarding panel, find the Create a Team card and click the Create a Team link. Vision takes you to the team creation page.
3. Name your team
In the Name field, type the name you’d like to give your team — for example, your studio, brand, or company name.
Tip: Choose a name your collaborators will recognise. You can always update it later from your team settings.
4. Confirm the team
Click the Create button. Vision creates your team and redirects you back to the Dashboard.
The onboarding panel disappears and your new team name appears in the team switcher at the top of the page. The Projects link and the rest of the team workspace are now available.
Path B — Join a team via invitation
2. Open the Dashboard and review your invitations
After signing in, you’ll see the onboarding panel with a Join a Team card. If a team owner has already sent you an invitation, it appears as a pending invitation beneath the card, showing the team name.
Tip: Don’t see an invitation? Ask the team owner to re-send it and make sure they used the exact email address on your Vision account. Invitations are delivered instantly and appear here as soon as they’re issued.
3. Accept the invitation
Next to the team name in the pending invitations list, click the Accept link. Vision processes the invitation and redirects you to the Dashboard.
The onboarding panel disappears, the invited team’s name appears in the team switcher, and Projects and the rest of the workspace are now accessible.
Next steps
Your Vision workspace is ready. Whether you created a team or joined one, you can now open the Projects section and start your first project. If you’re the team owner and want to bring colleagues in, head to your team settings and send them invitations so they can follow this same onboarding flow.
When you’re ready to start creating, take a look at the guides for Background Removal and Person Swap to see what Vision can do with your first images. And if you need more AI credits to power your work, the Credit Topup guide shows you how to top up your balance.